This short tutorial presents a simple "Hello World" program for the STMicroelectronics STM8S001J3 Reference design, with an extra Hobby Components HCCABL0015 USB to RS232 TTL Serial Interface Cable.
For this tutorial, I used a Debian GNU/Linux system, but the tutorial should work for other Linux distributions, MacOS, *BSD or other Unices.
The STMS001 is a rather new addition to ST's STM8 portfolio. At the time this tutorial was written, no STM8S001 evaluation boards were available commercially. Fortunately, an ST engineer has published a reference design, and sent me one boards (it is an early prototype with jumper wires soldered on the underside). The final version of the board has since become available via Rutronik.
The STM8S001 has only 8 pins, and multiple I/O functions are connected to each pin. There is no reset pin, and the SWIM pin is shared with other I/O. Thus the device can easily be bricked by enabling output on an I/O that shares the pin with SWIM early. While writing this tutorial, I made a mistake reading the datasheet, taking a value from a wrong line, accidentally enabling output on an I/O shared with SWIM. Since the STM8S001J3 wasn't easily available then, I had to wait a few weeks before I was able to get and solder a new one onto my board.
The tools we use are
- The SDCC compiler, version 3.6.0 or later to compile C programs for the stm8.
- stm8flash, to write programs onto devices.
Hardware setup
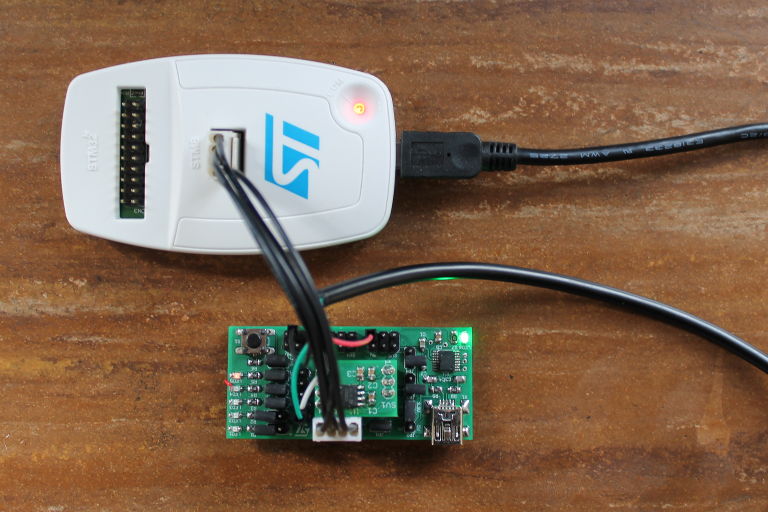
To write our program to the board, we attach an ST-Link/V2. We use the serial interface cable for power (connecting red to SV5, black to SV3) and data (green pin 1 on SV7, white to pin 2 on SV7). JP9 and JP10 are open. On the USB end the serial interface is connected to a computer running a terminal program configured for 9600 baud, no parity, 8 bits, 1 stop bit and no flow control. We used gtkterm.
Get SDCC
Depending on your operating system there might be an easy way to install SDCC 3.5.0 or newer using a package system or similar (e.g. apt-get install sdcc on Debian). While SDCC 3.4.0 should be sufficient for this tutorial, you might want to try a newer version in case you encounter any bugs. In particular, SDCC 3.4.0 has an issue with the library search path; this can be worked around by explicitly specifying the path to the standard library when linking.
SDCC binaries or a source tarball can be downloaded from its website.
Get stm8flash
The stm8flash source can be found at its GitHub location, where there is also a download link for a zip archive of the sources. To compile it, a C compiler, such as gcc, pkg-config and libusb need to be installed. Unzip the archive (e.g. using unzip stm8flash-master.zip) change into the directory stm8flash-master and type make. In case there are any errors, such as header files not found, check that pkg-config and development files for libusb are installed.
The Demo
We present a simple Demo that repeatedly outputs "Hello World!" on UART1 (the only UART the STM8S001 has). This demonstrates setting up and using the UART for serial I/O. Here is the C code:
// Source code under CC0 1.0
#include <stdint.h>

#define CLK_CKDIVR	(*(volatile uint8_t *)0x50c6)
#define CLK_PCKENR1	(*(volatile uint8_t *)0x50c7)

#define TIM1_CR1	(*(volatile uint8_t *)0x5250)
#define TIM1_CNTRH	(*(volatile uint8_t *)0x525e)
#define TIM1_CNTRL	(*(volatile uint8_t *)0x525f)
#define TIM1_PSCRH	(*(volatile uint8_t *)0x5260)
#define TIM1_PSCRL	(*(volatile uint8_t *)0x5261)

#define UART1_SR	(*(volatile uint8_t *)0x5230)
#define UART1_DR	(*(volatile uint8_t *)0x5231)
#define UART1_BRR1	(*(volatile uint8_t *)0x5232)
#define UART1_BRR2	(*(volatile uint8_t *)0x5233)
#define UART1_CR2	(*(volatile uint8_t *)0x5235)
#define UART1_CR3	(*(volatile uint8_t *)0x5236)

#define UART_CR2_TEN (1 << 3)
#define UART_CR3_STOP2 (1 << 5)
#define UART_CR3_STOP1 (1 << 4)
#define UART_SR_TXE (1 << 7)

#include <stdio.h>

int putchar(int c)
{
	while(!(UART1_SR & UART_SR_TXE));

	UART1_DR = c;

	return(c);
}

unsigned int clock(void)
{
	unsigned char h = TIM1_CNTRH;
	unsigned char l = TIM1_CNTRL;
	return((unsigned int)(h) << 8 | l);
}

void main(void)
{
	CLK_CKDIVR = 0x00;  // Set the frequency to 16 MHz

	// Configure timer
	// 1000 ticks per second
	TIM1_PSCRH = 0x3e;
	TIM1_PSCRL = 0x80;
	// Enable timer
	TIM1_CR1 = 0x01;

	// WARNING: WITHOUT A DELAY THE STM8S001 CAN BE BRICKED BY ENABLING SERIAL OUTPUT!
	for(volatile unsigned long int i = 0; i < 147456; i++); // Sleep
	while(clock() / 1000 < 8); // Wait 8s.

	CLK_PCKENR1 = 0xff; // Enable peripherals.
	UART1_CR2 = UART_CR2_TEN;                        // Allow TX and RX
	UART1_CR3 &= ~(UART_CR3_STOP1 | UART_CR3_STOP2); // 1 stop bit
	UART1_BRR2 = 0x03; UART1_BRR1 = 0x68;            // 9600 baud

	for(;;)
	{
		printf("Hello World!\n");
		for(volatile unsigned long int i = 0; i < 147456; i++); // Sleep
	}
}
SDCC is a freestanding, not a hosted implementation of C, and allows main to return void. Note that in older versions of SDCC putchar() takes char and returns void. This was not standard compliant has been changed in current SDCC versions.
The printf() from the standard library uses putchar() for output. Since putchar() is device-specific we need to supply it. In this case we want it to output data using UART1.
The demo can be compiled simply by invocing SDCC using sdcc -mstm8 --std-c99 serial.c assuming the C code is in serial.c. The option -mstm8 selects the target port (stm8). An .ihx file with a name corresponding to the source file will be generated.
Put the demo onto the board
Assuming stm8flash and serial.ihx are in the same directory, the board is attached through the integrated stlink device, ./stm8flash -c stlink -p stm8s001j4 -w serial.ihx will write the demo onto the board. You can see the "Hello world" via the serial interface cable, and using a terminal program configured for 9600 baud, no parity, 8 bits, 1 stop bit and no flow control.
More about stm8flash
stm8flash was written by Valentin Dudouyt. It works both with stlink (including the one integrated on the discovery boards) and stlinkv2 devices. The programmer can be selected using -c stlink or -c stlinkv2. The target device is selected using the -p option (to get a list of target devices, use the -p option with an option argument that is not an stm8 device, e.g. -p help. stm8flash will treat filenames ending in .ihx or .hex as Intel hex, and other filenames as binaries.
More about SDCC
SDCC was initially written by Sandeep Dutta for the MCS-51, and has a relatively conservative architecture (see Sandeep Dutta, "Anatomy of a Compiler", 2000). It has been extended by various contributors and more recently, incorporated some cutting-edge technologies, in particular in register allocation (see Philipp Klaus Krause, "Optimal Register Allocation in Polynomial Time", 2013). The stm8 backend was mostly written by Philipp Klaus Krause for his research into bytewise register allocation and spilling (see Philipp Klaus Krause, "Bytewise Register Allocation", 2015).
SDCC is a C compiler that aims to be compliant with the C standards.
Important compiler options for STM8 developers include:
-cto compile into object files to be linked later--std-c99for compilation in C99 mode (some C99 features, e.g. variable-length arrays are not yet supported in sdcc though)--opt-code-sizefor optimization for code size--max-allocs-per-nodeto select the optimization level. the default value is 3000. Higher values result in more optimized code, longer compiler runtime, and higher memory usage during compilation.